10 Celebrities Reveal Their Surprising Secrets to Looking Younger

Glamour industry demands that you look ageless. But, these celebrities are no more 18. So, what is that these stars ingest that everyone gets influenced by their radiant complexion.

You don’t have to sneak their personal spa for that. Instead, read on this article to educate yourself with the #1 secret beauty tips revealed by these glamour ladies themselves.

10 Stars Reveal Their #1 Secret for Flawless Skin

#1 Halle Berry

Apart from using products from Kinara Spa, this American actress cleanses and moisturizes her skin regularly in the morning and before going to bed.

When needed she also lays off from the chemical incorporated makeup to give her skin a break.

#2 Jessica Hart

With changing weather, she recommends to change beauty products depending on your skin type.

She personally use Dr. Hauschka’s Rose Day Cream Light in summer and La Mer Crème de la Mer in winter.

#3 Jennifer Aniston

Even at the age of 49, she continues look younger. In a talk show its revealed that she uses intense chemical peels and Mila Moursi Rejuvenating Serum.

Read this before trying chemical peels.

#4 Reese Witherspoon

Apart from eating healthy and regularly hydrating from the inside by drinking enough water, this actress uses Chanel Hydramax Active Moisture Cream.

#5 Gisele Bundchen

In an interview with Elle she told that once when she experienced pimple her makeup artist recommended Nelsons Acne Gel when she uses till date. Apart from that Lancome’s pink foaming cleanser and Victoria’s Secret Total remover for eyes.

#6 Christie Brinkley

This American model recommends exfoliating your skin regularly to make it fresh and smooth. You can opt any cleanser that is gentle available at the store.

#7 Lea Michele

This American actress say she experienced best result by drinking enough water and having required sleep.

Simple, isn’t it?

#8 Olivia Culpo

She says after meeting her beautician she began to understand how the skin gets natural glow. How frequently you cleanse your skin and what you topically apply on it directly impact on your appearance.

She recommends ingesting more greens to beat acne and other skin disorders.

#9 Cate Blanchett

Facial massage can reduce stress and can help you to obtain better glow.

#10 Leona Lewis

She says that her main beauty ingredients are from her kitchen room. So, opt for natural home remedies instead of chemical filled creams.

Most effective ways of using Castor Oil for Eyebrows

Eyebrows certainly complement the structure and contour of a person’s face. Else why would women all over the world spend their weekend’s plucking and tweezing them into a perfect shape?

Castor Oil for Eyebrows

Thick eyebrows, perfectly plucked from the edges, and properly maintained are a desirable trait. This is not the latest fashion trend, but something that goes back to ancient time.

Though there is something that is latest in the beauty trends, and it is the use of Castor oil for eyebrows. Castor oil has immense benefits that include treating health and skin ailments, though recently, it has gained the attention of women who want to grow thick eyebrows and draw attention to their foreheads.

Castor oil has an excellent reputation for being a potential solution for those people who suffer from hair loss. Hence, the castor oil for eyebrows became a popular solution too.

Benefits of using castor oil for eyebrows:

Castor oil is a versatile ingredient that can be effective at making your eyebrows bolder, thicker, and re-grow the lost hair.

1. It is rich in fatty acids, minerals, and abundant minerals. The oil helps in nourishing the hair follicles and promotes hair growth on the area of application.

2. It has anti-microbial and anti-inflammatory properties which soothe the inflammation after tweezing.

3. Castor helps reverse the hair growth after heavy waxing and shaving by regenerating the dormant follicles.

4. It has an abundant amount of ricinoleic acid which is helpful at adding volume after brow loss.

How to use castor oil on eyebrows:

Below are the five most effective ways of using castor oil for eyebrows. Read each one of them; pick one that fits both your budget and the skin care regimen. Make sure you stick to your routine.

1. Castor Oil Massage

Since castor promotes the regrowth from dormant follicles, a good massage can be highly effective at adding volume to your brow.

Ingredients you’ll need:

  • 1/2 tsp Castor Oil
  • A regular Cleanser

Method for Application

  • Wash and clean your face with your regular cleanser.
  • Pat your face dry.
  • Take some castor oil and rub it over your eyebrows using your fingertips.
  • Massage your eyebrows in a gentle circular motion.
  • Once the oil is absorbed, let it sit overnight.
  • Wash it off in the morning using lukewarm water.

Massaging will stimulate blood circulation, provide nourishment to hair follicles, and promote growth.

2. Coconut oil and Castor Oil

You can use castor oil with coconut oil to decrease its consistency.

Ingredients you’ll need:

  • 1/2 tsp Castor Oil
  • 1/2 tsp Olive or Coconut Oil

Method for Application

  • Wash your face with your regular cleanser.
  • Pat your face dry.
  • Blend castor and coconut oil in a bowl.
  • Rub the mixture over your eyebrows using your fingertips.
  • Massage your eyebrows in direction of the hair growth.
  • Let it sit overnight.
  • Wash it off in the morning.

3. Glycerin and Castor Oil for Eyebrows

Glycerin will stimulate blood circulation, and castor oil will provide nourishment to hair follicles, and promote growth.

Ingredients you’ll need:

  • 1/2 tsp Castor Oil
  • 1/2 tsp Glycerin

Method for Application

  • Wash and pat dry your face.
  • Take some castor oil and rub it over your eyebrows using your fingertips.
  • Wait for a minute, then apply glycerin onto your Massage your eyebrows.
  • Allow it to sit overnight.
  • Wash it off in the morning using a cleaner.

4. Aloe Vera and Castor Oil for Eyebrows

Aloe-Vera is known for its excellent anti-microbial and anti-inflammatory properties, and it lightens the consistency of castor oil.

Ingredients you’ll need:

  • 2 tsp Castor Oil
  • 2 tsp Aloe Vera Gel
  • Mascara Wand

Method for Application

  • Blend the castor oil and Aloe Vera Gel in a jar.
  • Clean and pat dry your face.
  • Apply the mixture using a mascara wand.
  • You can apply the same to your eyelashes.
  • Leave it to sit overnight.
  • Wash off in the morning.

5. Vitamin E and Castor Oil

Vitamin E can lengthen your eyebrows and the eyelashes. It can also help restore the brows that got thinned due to excess hair removal.

Ingredients you’ll need:

  • 1/2 tsp Castor Oil
  • 1/2 tsp Vitamin E oil

Method for Application

  • Wash and pat dry your face.
  • Blend both oils in a jar.
  • Rub the mixture over your eyebrows using your fingertips.
  • Allow it to sit overnight.
  • Wash it off in the morning using a cleaner.

Special Tips

Though Castor Oil is highly effective, it promotes allergies in some people. Thus, it is important to conduct a patch test before including it into your skin care regimen. For patch test, put a small amount of castor oil on your inner wrist, and see if it produces any rashes or itching. Continue the usage if there is no abnormal symptom.

How To Lighten Dark Lips Permanently Using Honey?

Dark spots on lips are not something serious for your health, but these spots are indications of some abnormalities or lack of one or more essential elements in the body.

honey for dark lips
lifestyleslife.com

One of the biggest reasons you would want to get rid of the darkness of lips is self-consciousness. Although prolonged and severe darkness should not be taken lightly and you should consult your doctor, the darkness of lips during initial stages is very easy to remove.

There are so many home remedies proved very effective for dark lips, but honey has been one of the best remedies to get rid of dark lips.

Let’s discuss the causes of dark lips, benefits of honey, and how to use it effectively to combat darkness of the lips.

(Read: DIY Sugar and Honey Lip Scrub )

Causes of Dark Spots on the Lips:

Numerous factors can be responsible for dark lips, but we have highlighted some of the major factors to assist you to manage at home.

Deficiency of Vitamin:

Several vitamins mainly Vitamin B12 are responsible for maintaining the tonicity of your skin. Deficiency of Vitamin B12 can cause several health-related issues including uneven skin tone and dark spots on the lips.

Hyperpigmentation:

There are so many responsible factors behind hyperpigmentation or melasma. Hormonal imbalance, especially in pregnant women, is the major cause of hyperpigmentation and it causes dark patches on different parts of the body including lips.

Allergies:

You can get skin allergies from so many different things around you. Depending on your body’s reaction to various allergy-causing agents like pollens, dust, face makeups, lipsticks, lip balms, hair dyes, and various herbal teas etc. you can get skin allergy, and in the result, your skin can get dark.

Medications:

Several medications and drugs including antiarrhythmic, anticonvulsants, antipsychotic, antimalarial, and cytotoxic drugs are also responsible for marked changes in skin color and dark spots on the lips.

Why Honey is an Excellent Option for Dark Lips:

Excellent Skin Moisturizer:

Dryness of the lips can also be a factor behind lips’ darkness. As you know, honey is used in numerous beauty and skin products thanks to its moisturizing properties. It will keep your lips moisturized for very long and help you to combat the dark spots.

Improves Skin Tonicity:

Using honey for skin can also be very effective to improve the lost tonicity of the skin. Improvement in skin tonicity will also assist you to get back the natural color of your lips.

Assists Natural Glow:

Direct application of honey will surely help you to get incredibly clear and glowing skin, and lack of tonicity and darkness of lips are also going to ease off.

Very Useful in Sunburns:      

Sunburn is another factor behind dark lips. Honey is one of the best home remedies to cure sunburn. It decreases the inflammation due to sunburn and promotes the overall healing process. Dark lips due to sunburn will also get the natural glowing color.

How to Use Honey for Dark Lips:

If you want to get maximum results of honey in case of dark lips, you should use in best possible ways. Here are some tried and tested methods of using honey for dark lips.

Honey with Lemon:

Amazing astringent properties of lemon will back the advantages of honey. The moisturizing properties of honey and astringent nature of lemon are going to work wonders for your lips. Here are the tips to use.

  1. Mix equal amount of honey and lemon in a little bowl.
  2. Take half tbsp. of the mixture and apply properly on lips using your fingers.
  3. Keep the mixture on for 30 to 45 minutes and then wipe off using water.

Honey and Rose Water:

Rose water is in use for various skin conditions for a very long time. Using it with honey will not only improve the discoloration of your lips, but it will also keep your lips moisturized and tinted. Have a look at the method of using honey with rose water. Adding a helpful of rose petals will make your job very easy.

  1. Mash the rose petals gently to make a thick paste
  2. Add one tbsp. rose water and one tbsp. honey to it.
  3. Mix all the three ingredients properly.
  4. Apply the paste on the lips properly and keep wearing for half an hour.

Honey with Strawberries:

Strawberries are the rich source of Vitamins, and it is also very good to improve collagen production. Using them with honey will give your lips natural pinkish color free from all the dark spots. Here is the best way to use strawberries with honey.

  1. Mash one piece of strawberry and add one tbsp. honey
  2. Mix both ingredients properly and apply on the lips.
  3. Don’t get greedy and keep it on for 30 minutes.
  4. You will see the excellent results of using strawberry with honey.

4 Simple Ice cube recipes for Glowing Skin

The bright sun rays are indeed a great source of vitamins, but they are harsh for your skin.

The ultraviolet radiations are the reason behind skin irritation, sunburn, and many other skin problems. If you live in a tropical area with sun powering high above your head, there is no count of the issues frequently knocking on your face.

Though ice cubes are not very popular remedies for acne solutions, they are a hidden gem for sure. Whether you are concerned about a pimple appearing on your flawless skin or the freckles that crawl below your eyes, an ice cube can be a great solution.

We say that with certainty because Ice cubes for Skin are the ultimate answer to your worries. Check out how.

Is it useful to rub ice cubes on your facial skin?

Of course, it is. Or why else we’d be writing an article to share this gem of an ingredient with the world. Everyday stress of workplace and household activities take a toll on everybody, and there is an immediate need of a natural recipe that increased the blood circulation and keeps the face radiant.

Ice is that magic recipe. It has been inspiring many beauty trends. Here are some of the benefits of rubbing ice on your face:

  • Ice cube is the key to a glowing look. It improves the blood circulation in the facial muscles as it constricts the blood vessels, and creates a pulling effect on the skin.
  • Ice cubes reduce the dark circles. The stubborn dark circles can be cured with a pack of ice cubes if you combine it with cucumber juice.
  • Ice cubes soothe the acne or pimple breakout on the face by minimizing the production of oil and clearing the dirt.
  • Regular application constricts the skin pores. So, automatically, there is no accumulation of dust, and hence, no pimple.
  • It softens your lips. If you have dry, chapped lips, apply ice cubes over them, and see the change it brings within a couple of days.
  • Ice cubes for skin are the perfect remedy for skin rashes.
  • It relieves the sunburn and reduces the tweezing inflammation of the skin.

How to use Ice Cubes for Skin

The benefits are plenty. But it’s important to know the perfect recipe for using ice cubes. You know the secret ingredient to flawless skin, you know its multiple benefits, and now, all you need to know is the right way of using this ingredient.

Here, we have shared for you the natural recipes of Ice Cubes for Skin. Pick any one of these, include it in your skin care regimen, see the change it brings, and thank us later.

1. Green Tea Ice Cubes

Do you have tired and puffy eyes? Does the eye bag under your eyes bother you?

Don’t worry. We’ve got your back. Here’s a recipe you need to note if you wish to get rid of the stubborn puffiness under your eyes. Green tea has anti-oxidants which are highly effective at eliminating the dark patches.

Ingredients you’ll need:

  • Two green tea bags
  • Water
  • Ice tray 

Method for Application:

1. Keep the tea bags in hot water and brew it.

2. Pour the mixture into an ice cube tray and freeze it.

3. Apply the cube every night on your puffy eyes.

2. Aloe Vera Ice Cubes

Aloe Vera for Skin is not a secret. The world knows about its medicinal and skin-healing properties.

Ingredients you’ll need:

  • Aloe Vera Extract
  • Water
  • Ice tray 

Method for Application:

1. Pour the aloe vera extract into an ice cube tray and freeze it.

2. Apply the cube every day after sun exposure.

This recipe will soothe the inflammation and reduce the open skin pores.

3. Cucumber and Lemon Ice Cubes

Cucumber holds a special place in almost every woman’s beauty regimen. Its juices are extremely soothing for tired eyes and skin.

Ingredients you’ll need:

  • Cucumber 
  • Lime Juice

Method for Application:

1. Blend Cucumber and mix lime juice

2. Pour the mixture into an ice cube tray and freeze it.

3. Apply the cube every day.

Cucumber will calm your skin and lemon would brighten it up.

4. Cinnamon Ice Cubes

Ingredients you’ll need:

  • One teaspoon of Cinnamon powder 
  • Water
  • Rosehip Oil

Method for Application:

1. Blend the cinnamon powder and rosehip oil

1. Pour the mixture into an ice cube tray and freeze it.

3. Apply the cube all over your face.

Cinnamon’s antibacterial properties will cleanse and purify the skin and shrink the pores.

General Tips

  • Be Gentle while rubbing the cubes.
  • Make sure you are not wearing any makeup while applying these cubes.
  • Always massage in circular motion.

Natural Homemade Hair Removal wax to Remove Unwanted Hair at Home

Are you one of them who are looking for an easy method to remove unwanted hair from your body? If yes, read on complete article to know easy method to remove unwanted hair without causing any damage to your skin.

We often choose to shaving creams which are loaded with chemical products to remove the unwanted hair of our skin. But this process is temporary and will not provide us desired results. Instead of shaving, waxing is the best way to get smooth and clear skin. Because waxing process will remove the hair from its roots and it take more time for your hair to regrow back.

So, now it’s time to say good bye for long queues in the parlors and hair removal creams that contain harsh chemicals that damages our skin, simply prepare your own wax in your home to pamper your skin.

Check out simple homemade wax made with natural ingredients to remove unwanted hair at home

Home Made Hair Removal Wax:

Things You Need:

  • 2 cups of sugar
  • ¼ cup of lemon juice
  • ¼ cup of water
  • 2-3 drops of any essential oil

How To Prepare:

  • Mix all ingredients in a small bowl and put it on the stove and set the temperature from medium to high.
  • Stir the mixture constantly until you get syrup like consistency. Generally sugar burns very easily, so don’t stop stirring for too long.
  • Once the mixture turns in to golden brown color remove the wax from heat and store it in a glass jar.
  • Allow the wax to cool down completely at least before two hours of use.

How To Use Sugar Wax:

  • Check whether the wax is warm enough to touch or not, if not place it in heat safe dish and allow it to warm in the microwave for 10-30 seconds.
  • Dip a wooden stick in to the wax and spread it over your skin in direction of hair growth.
  • Cover the wax area with a thin cloth strip and press it down, so that it sticks to your skin completely.
  • Grasp the end of the cloth and pull it off in a quick motion away from your skin. If done correctly you can see the hair stick to cloth.
  • If you still see hair on your skin reapply the wax and continue the process until you get smooth and clear skin.
  • You can even reuse the clothes after waxing.

How to Use Turmeric for Facial Hair Removal?

Facial hair is one of the most embarrassing things for many women to handle. That’s the reason they go for painful treatments like waxing, threading, plucking and shaving. But all these treatments often results us in giving temporary happiness and make us to stand in the same place again and again.

Have you ever tried natural ingredients to remove facial hair? If your answer is big NO, then it’s time for you to use wonderful ingredient which was using from centuries to treat all types of skin issues and health issues in the world. It’s none other than Turmeric. Yes, turmeric is capable of removing facial hair completely and gives you glowing and shiny, beautiful skin.

So, turmeric is short formula for complete removal of facial hair that makes you to feel happy to enjoy with your flawless skin.

How Does Turmeric Work For Removing Facial Hair?

Turmeric is an ancient herb loaded with anti bacterial, anti septic, anti inflammatory and anti microbial properties that help to treat skin problems like acne, blemishes and even reduce redness and inflammation.

It inhibits the growth of hair with its amazing properties and its sticky nature when combined with other ingredients will remove the hair from the roots.

Regular use of turmeric on your face often results in giving you that flawless face without any hair.

How to Use Turmeric For Removing Facial Hair:

They are several ways to use turmeric to remove facial hair. Some of them include:

#1 Turmeric Paste:

This is very simple method and easy to use it to remove facial hair.

What You Need To Do:

  • Mix one table spoon of turmeric powder with enough amount of water to make a thick paste.
  • Apply it after cleaning your face as a mask and more concentrating on facial hair.
  • Let it sit for few minutes and clean it with the help of clean cloth dipped in warm water and make sure to it a scrub motion.
  • Finally wash your face with normal water and repeat it 2-3 times in a week to see excellent results.

#2 Turmeric With Raw Papaya:

Papaya is rich in enzyme called papain that restricts the growth of hair and prevent them completely when they mixed with turmeric powder.

What You Need To Do:

  • Mix 2 table spoons of papaya paste with ½ table spoon of turmeric powder and spread this paste all over your face as a mask.
  • Leave it for 15-20 minutes and wash it off with normal water and allow your skin to dry.
  • Do this twice in a week to see improvement in removing facial hair.

#3 Turmeric With Lemon And Sugar:

The mixture of lemon and sugar with turmeric acts as waxing treatment for removing unwanted hair on your face.

What You Need To Do:

  • Boil one cup of water by adding ½ cup of sugar until it becomes sugar syrup.
  • Turn of the heat and allow the sugar syrup to cool down and add little amount of turmeric and lemon juice to make it a thick paste.
  • Apply this paste in the directions of your hair growth and scrub it in circular motion for few minutes.
  • Rinse it off with water and use a damp cloth to rub in the opposite direction.
  • Continue doing the same process for 2-3 times in a week to get shining face without facial hair.

 #4 Turmeric With Indian Nettle:

Indian nettle or neem has the capability to get deep in to skin and reduces the thickness of facial hair and turmeric pull off the hair easily.

What You Need To Do:

  • Wash handful of neem leaves and blend them to make a fine thick paste.
  • Mix one table spoon of neem paste with one table spoon of turmeric root paste.
  • Apply it on clean face and leave it for few hours and rinse it off with normal water.
  • Do it regularly to remove facial hair completely.

#5 Turmeric With Salt And Milk:

Salt is capable of thinning facial hair and milk moisturizes the skin to be clean and the combination of these three wonderful ingredients results in giving us positive results in preventing or removing facial hair.

What You Need To Do:

  • Place 2 table spoons of turmeric in little amount of milk and 3 table spoons of gram flour and a pinch of salt.
  • Mix all ingredients in a small bowl until you see a thick paste.
  • Spread this paste all over your face and especially on the areas where you have unwanted facial hair.
  • Rub it for 5-10 minutes in circular motion and allow it to dry on its own.
  • Rinse it off with luke warm water and repeat the same process to get rid of facial hair completely.

Tips To Follow:

  • Make sure to do patch test before applying turmeric on your face, if you observe any allergic reactions or negative results then stop using it.
  • The best time to apply this mask is after steam bath to get best results.
  • Always wear old clothes to avoid stains and remember to wash your face with cleanser after applying mask to remove the yellowness over your face.
  • You can easily remove turmeric stains by dipping them in to apple cider vinegar solution or rubbing almond or coconut oil mildly on the stains to clear it.
  • The best and pure turmeric used as a home remedy is Kasturi manjal turmeric.

How to Use Rose Body Scrub For Glowing Skin

We do numerous things to protect our skin in all the ways we can. But, the environmental factors and unhealthy habits often results in causing some side effects that we often neglect.

Body scrubs are something that protects our skin to remove all dead skin cells and keep our skin healthy. Whereas body scrubs available in market are very expensive and cannot be afforded by many people. Scrubbing your body using natural ingredients is a great way to exfoliate your skin and to add nourishment.

Here is an excellent recipe for body scrub using rose and coconut oil which is very easy to prepare and loaded with numerous skin benefits.

Benefits:

Rose:

Roses have therapeutic properties that benefit that helps in relaxing your body by improving the glow of your skin. Rose petals contain natural oils and sugars that will help to lock moisture in to dry skin cells. It also adds healthy glow to your skin and maintains it healthy all day long.

Coconut Oil:

Coconut oil keeps your skin hydrating and acts as a perfect moisturizer to keep your skin soft and healthy. Additionally, the anti bacterial and anti fungal properties protect your skin from certain skin issues.

Sugar:

Sugar is considered as natural skin exfoliator that helps to get rid of dead skin cells and protect your skin. Sugar is also great source of glycolic acid that penetrates deep in to your skin and encourages cell turnover.

Recipe For Rose Body Scrub:

Things You Need:

  • Handful of fresh rose petals
  • 6 table spoons of sugar
  • 6 table spoons of coconut oil

Steps To Prepare:

  • To a blender add sugar and coconut oil, blend it until well combined.
  • Now, add rose petals and blend the mixture again.
  • Scoop this mixture in to a clean airtight jar and here we go with natural and best body scrub for your healthy skin.

18 Ways to Use Green Tea as a Beauty Product

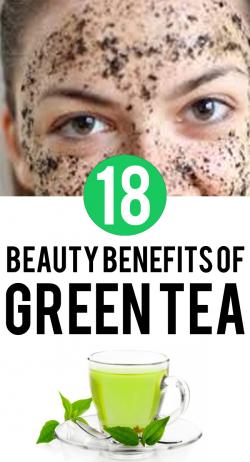
Green tea is not only limited as an essential drink for losing those extra pounds from your body, but it is also considered as one of the most useful ingredient that do wonders on your skin, hair and body.

Many people aren’t aware of complete benefits provided by this simple ingredient in our regular beauty routine. That’s the reason we came up with 18 different ways to use green tea as a beauty product.

Check out all the recipes given below to maintain smooth skin, gorgeous hair and even healthy body.

Green Tea Recipes For Your Face:

Green tea has anti inflammatory and anti oxidant properties which are beneficial to maintain healthy skin.

#1 Green Tea Face Mask:

All you need to do to prepare green tea face mask is, take a small bowl tear open two bags and mix it with little amount of honey until it becomes a thick paste.

Spread this paste all over your face, thin it out by adding few drops of olive oil. Let it remain for 15 minutes and rinse with water thoroughly.

#2 Blemish Free Skin:

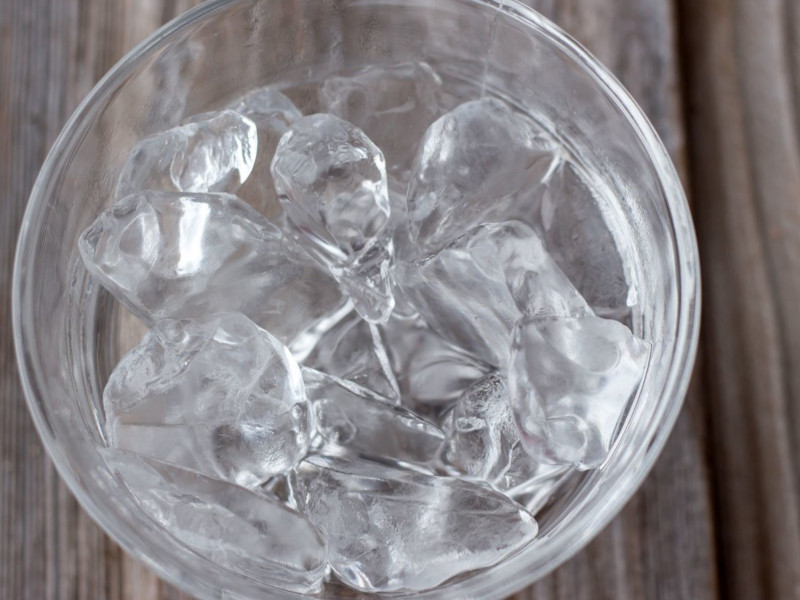
Prepare green tea by soaking 2 tea bags and let it cool down. Add 2 drops of tea tree oil and lavender essential oil and mix them well and freeze in an ice cube tray.

This works effectively as a spot treatment. You can also pour this mixture in a spray bottle and use it as an acne fighting toner.

#3 Simple Toner:

Soak a tea bag in a cup of warm water and remove the tea bag and let it cool down. Use this tea bag and apply it to your face to tone your skin. You can also apply green tea using a cotton ball on your face to tone your skin. 

#4 Cooling Toner:

This toner is perfect for all skin types without any side effects. Take ¼ cup of cooled green tea, 2 tablespoons of cucumber juice and one table spoon of aloe Vera gel. Blend all ingredients and pour this mixture in a spray bottle.

That’s it you’ve got your cooling soothing toner for your skin.

#5 Green Tea As Cleanser:

Add 3-4 table spoon of cooled green tea with your regular creamy cleanser stir it up and slather it down. Allow it to sit for 5 minutes and gently rub your skin in circular motion to remove all dead skin cells and rinse to prevent them away.

#6 Prevents Breakouts Of Skin:

Take one table spoon of cooled green tea and spread it on your face by using a cotton ball. Leave it for 15 minutes and wash your face thoroughly with clean water.

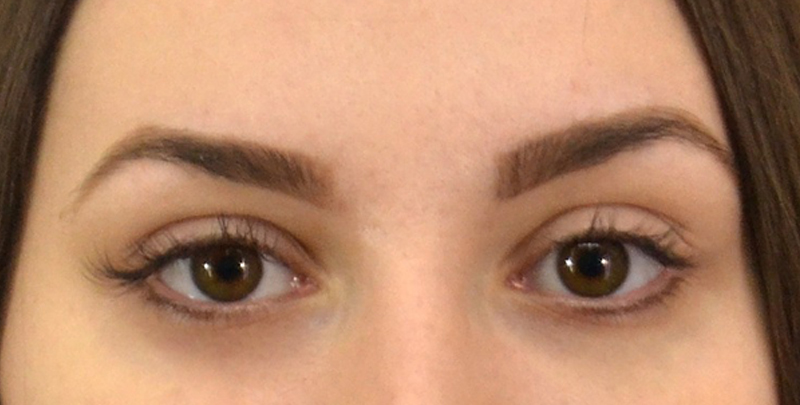
#7 Green Tea Eye Treatment:

Take 2 green bags soaked in cool water and place them over your eyes for 15 minutes. The caffeine content in green tea will reduce swelling and soothe the eye area if it is infected.

#8 Green Tea Yogurt Face Mask:

The combination of green tea and yogurt will fight against blemishes and balances the PH level of the skin. Take a small bowl and take inside the brewed green tea bag with one table spoon of yogurt and one table spoon of lemon juice and mix them well.

Spread it all over your face and leave on for 20 minutes and rinse.

#9 Green Tea And Lemon Juice Toner Mask:

This mask is best to fight against acne and ageing signs. Take 2 table spoons of green tea and ½ tea spoon of lemon juice and a pinch of turmeric, mix them well together.

Apply this mixture all over your face and leave it for 10 minutes and rinse thoroughly.

#10 Green Tea Super Easy Mask:

Tear up 3 green tea bags and mix the content with little amount of moisturizer. Now, add 1/8 teaspoon of sugar, 2 egg yolks and table spoon of warm water and one table spoon of rolled oats.

Spread this mixture all over face and allow it to dry and rinse it off thoroughly.

#11 Green Tea, Sugar And Cream Scrub:

This works perfect for dry skin and rough skin. Steep a green tea bag and mix the inside with one table spoon of sugar and little amount of cream.

Spread this mixture all over your face in circular motion to scrub off all dead skin cells.

#12 Green Tea Recipes For Hair:

Green tea helps to maintain strong and healthy hair that look gorgeous.

#13 Green Tea Dandruff Remedy:

Dandruff is the common problem face by many people. Green tea is the best solution to get rid of dandruff, all you need to do is take one cup of water then add 2 table spoons of green tea leaves, one lemon peel and 4 table spoons of coconut oil.

Heat the mixture for 2 minutes or 20-30 seconds in a microwave. Allow it to cool down by removing it from the heat. Apply this mixture all over your scalp using a cotton ball and massage the scalp with your fingers for few minutes. Rinse it off thoroughly after 45 minutes.

#14 Green Tea As A Conditioner:

Steep 2 tea bags in 3 cups of water and allow it to completely cool down. Rinse your hair with this solution after final wash of your hair. This process leaves your hair smooth and shiny.

#15 Green Tea Hair Growth Mask:

Take 2 table spoons of well steeped green tea and mix them with one egg yolk. Apply this mixture over your scalp and leave it for 30 minutes, rinse it off thoroughly.

#16 Green Tea As Deep Conditioner:

Take one cup of green tea and add one table spoon of coconut oil and one table spoon of honey mix them well. Apply this mixture on your scalp thoroughly and rinse it off after 30 minutes.

Other Tea Instead Of Green Tea:

You can even use black tea or chamomile tea to rinse your hair after washing to leave your hair healthy and smooth.

Green Tea Recipes For Body:

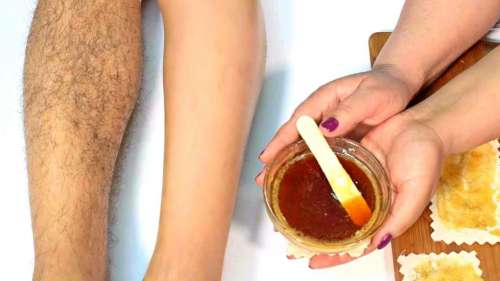
#17 Green Tea As Body Scrub:

Take one cup of green tea and add 1 cup of sugar and ½ cup of coconut oil and 1 table spoon of honey. Use this mixture to scrub your dry eye brows, knees and heels to make them soft.

#18 Green Tea As Mouth Wash:

Use a cup of green tea as a mouth wash to prevent bad breath and other dental issues. You can even brush your teeth with mixture of green tea leaves and baking soda to have healthier gums and teeth.